Don't Miss

Latest Posts
Browsing Category "Google"

How to Get 2GB Google Drive Storage for Free

- 36 Comments
Here's a step by step guide on How to Get 2GB Google Drive Storage for Free. Google Drive is one of the most popular and widely used cloud services. It is used by millions of people around the world. Every account holder has his own storage that he can use, if that limit exceeds then you've to buy more space. You can use Google Drive for sharing your files or hosting your scripts. If you want to add 2GB extra space to your account for free then hurry up! You can get 2GB extra storage for free by just completing your account security check, which hardly takes 30 seconds to complete. Yes! By just completing a security check. So, if you want 2GB storage for free, just follow the below steps, make your account more secure and get 2GB storage for free.

Note: You’ll have to complete this security checkup before February 17th to get this extra storage. The additional 2GB storage will be added to your account around the end of the month.
How to Get 2GB Google Drive Storage for Free

How to Get 2GB Google Drive Storage for Free

To get 2GB Google Drive storage for free, you've to complete a quick security check for your account. Fist of all visit Get Free 2GB Google Drive Storage to go to the security check page. Log in to your account and it'll redirect you to the security check up page
How to Get 2GB Google Drive Storage for Free
Now, enter your account recovery information and click All Done, you will be taken to the Recent activity section. Check your Recent Activity and if everything is right then click Looks Good button.
How to Get 2GB Google Drive Storage for Free
Next you will be taken to the Account Permissions section, click Done. At last check your Account Verification Setting and click Done. Now just click Continue to Account setting and you're done! Now you're eligible for a free 2GB worth of space.
How to Get 2GB Google Drive Storage for Free
Note: You’ll have to complete this security checkup before February 17th to get this extra storage. The additional 2GB storage will be added to your account around the end of the month.

Enjoy your free extra space!

Why Google Isn't Indexing your Website - Possible Reasons

- 28 Comments
Why Google is not Indexing my Site?! Are you facing the same Problem? Having you website indexed by Google is one of the most important parts of SEO. Your site must be indexed by Google if you want to get massive organic traffic from Google. If your site is not indexed, you are lost. You will get no organic traffic from Google and no one will see your site in the Google Search Results. If you're facing the problem that Google is not indexing your site, so in this article we're sharing some possible reasons due to which Google is not indexing your site.
Why Google Isn't Indexing your Website - Possible Reasons

Your Website have Lots of Duplicate Content

Having Duplicate content is a major problem which prevents Google to index your website/blog. To much duplicate content on your site confuses the search engines and they give up on indexing your site. If multiple pages/URL's on your website are returning to the exact same content, then your website has a duplicate content issue and that's the reason Google is not indexing your site.

Your Site is Indexed under a www or non-www Domain

If your website is indexed under a www or non-www Domain, then Google may not index your site because technically www is a sub-domain. So, be sure that you add both with www and without www domain to GWT and verify ownership of both domains.

Google may not have Discovered your Site

If your website is new, then Google may not have discovered it yet. Wait for a few days and for better indexing Sign Up for Google Webmaster Tools and submit your sitemap. This helps Google crawl and index pages that it might not discover through normal crawling process.

Meta Tags

If your site has NOINDEX and NOFOLLOW meta tags in your template, it means you're saying no to the robots. Basically, these tags prevent Google to index your site. Here is the meta tag, so be sure that your site doesn't have these type of tags:
<META NAME="ROBOTS" CONTENT="NOINDEX, NOFOLLOW">

Robots.txt Disallow 

This file is in the root of your website and it communicates with search engines to index your site or not. If this file contains User-agent: * Disallow: / it means that its saying to crawlers that not to index any page of your site. The fix is easy, just remove that text from that text file and your site will be indexed.

Your Site Don't Have a Sitemap.xml

You haven't submitted your sitemap to GWT. If you haven't submitted your sitemap to Google Webmaster Tools or your Sitemap is not updating for some reason and you just have some old/broken links in GWT then you might face indexing problem. Read our article How to Submit your Sitemap to Google Webmaster Tools on to learn How to Submit Sitemap. If you've submitted your sitemap and you're still facing the problem then resubmit your sitemap.

Your Site Takes too Long to Load

If your website takes too much time to load then Google might not index your pages. Because in this case spiders will skip your site as they can't reach it, so they'll not index your site.

Connectivity or DNS Problems

If your website has downtimes, for this reason spiders cannot reach your server when they try to crawl, they fail, due to downtime. So check your connectivity and the fix is to contact your hosting provider or buy a new one.

There are also some other reasons that cause your site not indexed by Google. So if you're facing Google Index problem, then read and fix the above reasons and keep searching for more till your site gets indexed.

Create a Sliding Google Plus Followers Box in Blogger

- 10 Comments
Google Plus is one of the biggest social networks. Just like Facebook it allows people to create a profile, community and page. Google Plus is also a great way to drive massive traffic to your blog and sharing your posts on Google Plus increases your blog chances to appear in search results. Google gives more attention to the content shared on Google Plus. If you've created your Google Plus profile and you want to increase your followers, so in this tutorial we are going to share a sliding Google plus followers box. This box slides from the right side on hover with the followers box, it'll attract your visitors and they'll definitely follow you.
Create a Sliding Google Plus Followers Box in Blogger

Create a Sliding Google Plus Followers Box in Blogger

First and foremost, log in to your Blogger Account >> Select a Blog >> Layout >> Click Add a Gadget, scroll down and select HTML/JavaScript gadget from the list. Now copy the below code and paste it in the empty widget box

<script src="https://ajax.googleapis.com/ajax/libs/jquery/1.6.1/jquery.min.js" type="text/javascript"></script>

<script type="text/javascript">
//<!--
$(document).ready(function() {$(".gplusbox").hover(function() {$(this).stop().animate({right: "0"}, "medium");}, function() {$(this).stop().animate({right: "-330"}, "medium");}, 500);});
//-->
</script>
<style type="text/css">
.gplusbox{
background: url("https://blogger.googleusercontent.com/img/b/R29vZ2xl/AVvXsEjnSYKQkPyhRQYd_ulRJjXy0CgyDiDFEwJbVeXgBKoqFY9f97PlSfgB1Bz-OMTnuE72K8Hvwu-Egv3uu3tR81JEqxgFAUVlomGxWdcRilYx0bLM9mXYHnR2cyehHSrPPLL3RPT0hRg-ASt-/s1600/blogolect.png") no-repeat scroll left center transparent !important;
display: block;
float: right;
height: 275px;
padding: 0 0px 0 46px;
width: 325px;
z-index: 99999;
position:fixed;
right:-330px;
top:20%;
}
.gplusbox div{
padding: 8px;
background: white;
border: 2px solid #D64937;
border-radius: 2px;
border-right: 0;
border-top-right-radius: 0;
border-bottom-right-radius: 0;
}
</style>
<div class="gplusbox"><div>
<div class="g-plus" data-action="followers" data-height="300" data-href="https://plus.google.com/+zohaibliaqat" data-source="blogger:blog:followers" data-width="320">
</div>
<script type="text/javascript">

      (function() {
        window.___gcfg = {'lang': 'en'};
        var po = document.createElement('script');
        po.type = 'text/javascript';
        po.async = true;
        po.src = 'https://apis.google.com/js/plusone.js';
        var s = document.getElementsByTagName('script')[0];
        s.parentNode.insertBefore(po, s);
      })();
    </script>
</div></div>

  • Replace https://plus.google.com/+zohaibliaqat with your Google Plus Profile URL

Click Save button and you're done!

We hope this article may have helped you in Creating a Sliding Google Plus Followers Box in Blogger. Share this article with your friends, don't forget to subscribe us and Join our Bloggers Forum on Facebook @ https://www.facebook.com/groups/blogolectforum

Google's Domain Registration Service Now Open to All US Residents

- 8 Comments
Everyone knows the importance of a Custom Domain. Its is the first powerful step for a website. We already know many domain registrars like GoDaddy, Askforhost, Hostgator and Bigrock. But now Google is officially a domain registrar only in U.S.
Google's Domain Registration Service Now Open to All US Residents
This service was first launched in June 2014 and the service was only available to people through invite but now Google Domain Registration Service is Open to all U.S Residents.

Like all other domain registrars, Google domain registration starts at $12/Year. The service includes a domain name as well as extras like:

  • Private Registration
  • Email Forwarding
  • Support for up to 100 sub-domains 
  • Domain/URL Forwarding
  • Integration with Website Builder Services

Domain registration starts at only $12. Google has also added support for Blogger, making it easy for Blogger users to link up their blog with a new domain name. The service supports for over 60 domain extensions. You can also take advantage of integrated services through Google partners such as Wix and Weebly by paying additional fees.

This service is now open to all U.S residents. The company is planning to start this service in other countries but there's no timetable given. Those outside the U.S have the option to sign up to a mailing list in order to be notified when the service will be available in their country.

Share your thoughts about Google Domain Registration Service in the comments. Don't forget to subscribe us and stay tuned for more news.

How to Create Google+ Fan Page for Your Website/Blog

- 3 Comments
Creating Google+ Fan Page for your Website/Blog is one of the best ways to get more traffic to your blog. Google gives more attention to the posts or links published on Google+, which means that publishing your posts on Google+ plus will increase your chances to appear in search results. When you create a page, it works like a Google+ profile, where you can share anything including images and videos. You can start a hangout, you can add people on your circles. You can create Google+ Page for your Product, Local Business, Company, Institution, Brand, Art and Entertainment. So if you're looking to Create a Fan Page for your blog on Google+ then you're at the right place. Today in this tutorial we'll show you that How to Create Google+ Fan Page for Your Website/Blog.

How to Create Google+ Fan Page for Your Website/Blog

Step 2. Click on Product or Brand

How to Create Google+ Fan Page for Your Website/Blog

Step 3.Once you've selected the Category from the Category list, hit the Next Button

How to Create Google+ Fan Page for Your Website/Blog

Step 4. Now Enter your Website/Blog Name, your Blog URL Address, Check the Terms Box

How to Create Google+ Fan Page for Your Website/Blog

Step 5. After entering your blog information hit the Continue button, now your Google+ Page is almost created

How to Create Google+ Fan Page for Your Website/Blog

Step 6. Its time to Set your Profile Picture, Cover Photo, Contact Information and to Link your Website

How to Create Google+ Fan Page for Your Website/Blog

That's it... All done! Start publishing your Blog posts to your Google+ Fan Page and drive more Traffic to your Blog

From Editors Desk

We hope this tutorial may have helped you in learning How to Create Google+ Fan Page for Your Website/Blog. Share it with your friends and don't forget to subscribe us. Join our Bloggers Forum on Facebook @ https://www.facebook.com/groups/730927093629291

Google Rolls Out Panda 4.1 Against Poor Content

- 1 Comment
Recently, Google has announced that it is rolling out Panda 4.1 Algorithm against the poor quality content. The update has started rolling out and according to Pierre Far 3-5% queries will get affected from this update.
Google is rolling out this update to treat against poor quality content from search results.
Google Rolls Out Panda 4.1 Against Poor Content

How it will affect?

This new update is against the poor and thin content. Panda will identify the website with poor content and it will results in a greater diversity of high-quality small- and medium-sized sites ranking higher, which is nice.
In the announcement Pierre Far said:

Based on user (and webmaster!) feedback, we’ve been able to discover a few more signals to help Panda identify low-quality content more precisely. This results in a greater diversity of high-quality small- and medium-sized sites ranking higher, which is nice.

Depending on the locale, around 3-5% of queries are affected.

This update is good for those having quality content but also a headache for some those with thin content. So, if you see an increase in your traffic by the end of the next week then congrats its good and if you've a sudden decrease in your traffic, or if you see it in the coming days then its mean that this panda update has affected you.
SEJ's Founder Loren Baker said that:

This new Panda algorithmic update reinforces the fact that Google is not a fan of thin content and that crawl efficiency along with serving clear and direct data messages to Google are becoming more important than ever.Specializing XML sitemaps, trimming back on thin content and making sure that you are serving Google exactly what they need with minimal effort expended on part of Google-bot needs to be a huge emphasis. More so, also making sure that even in XML sitemaps, crawl priority is properly defined, and old content is not recrawled unless there is specific reason.

So, guys lets see what's going to happen next. We are calling this update ad 4.1 because Google said that the previous update was 4.0, then obviously this is 4.1.

How to Create Short URLs Using Google URL Shortener

- 57 Comments
URL shortening is a technique which is used by many bloggers, in this technique a URL is made shorter but it still redirect the people to the required URL. You can shorten URLs to make them easier to share. While sharing links on social networks many top companies always prefer short URLs instead of long URLs. For example, this short URL http://goo.gl/L4lf1G will redirect you to http://www.blogolect.com/2014/09/google-introduces-structured-snippets-in-web-search.html. So, instead of using this long tail URL I can simply use http://goo.gl/L4lf1G while sharing my link. Many web developers use descriptive URLs, this can result in long URLs. These URLs are difficult to memorize, thus short URLs are used instead of that long URLs. If your blog is hosted on blogger, and you want to shorten your URLs then you don't have to worry about it because Google itself provides you a free-to-use tool for URL shortening. Therefore today in this tutorial we'll show you that How to Create Short URLs Using Google URL Shortener.
How to Create Short URLs Using Google URL Shortener

Why to Use Google Shortener?

There are many other websites that provide URL shortening services, but the most preferred one is Google URL shortener. Feature of Google URL shoetener are:
  • Tracking: It gives you all the information about your short URL such as number of clicks on that URL etc.
  • Security:  It sends you security warning if URL points to spam website.
  • Speed: With its super fast speed, it loads quicker than any other services.

How to Create Short URLs Using Google URL Shortener

First of all go to http://goo.gl/ and log in to your Gmail Account. You'll redirected to its main page.
Now just enter the URL in the box and hit the Shorten URL button.
How to Create Short URLs Using Google URL Shortener
On pressing the button, your short URL for that link will appear including the link preview. Copy that URL and use it anywhere you want.
How to Create Short URLs Using Google URL Shortener
You can see all the URLs that you've shortened under that URL shortener field. It also displays the number of clicks for each URL, link with its short URL and the time of creation. You can also get more details of any URL by clicking the Details button next to that URL.

From Editors Desk

We hope this article may have helped you in leaning How to Create Short URLs Using Google URL Shortener. Share it with your friends and don't forget to subscribe us!

Google Introduces Structured Snippets in Search Results

- 1 Comment
Google web search has evolved in recent years. Recently Google has announced its new feature "Structured Snippets". Structured snippets is a new feature that Google has added in the search results and it is live now. Structured snippets incorporates facts into individual result snippets in Web Search.

Understanding the Structured Snippets

Interesting and relevant information is extracted from the post and is displayed in snippets. For example if your search for Nikon d7100 it will collect the relevant information from the post and will display it form of snippets.
If you search for a gadget, it will collect the relevant information from that post and it will be displayed in search results just like the image below.
This feature is not only for gadgets, see the below example, if you search for a comic hero, say batman, you can see some extra information next to its Wikipedia entry such as first appearance, created by etc.
This feature is not for some selected sites, we will see these snippets on many other sites soon. As according to Google

Structured Snippets is the latest collaboration between Google Research and the Web Search team employing that data to seamlessly provide the most relevant information to the user. We use machine learning techniques to distinguish data tables on the Web from uninteresting tables, e.g., tables used for formatting web pages. We also have additional algorithms to determine quality and relevance that we use to display up to four highly ranked facts from those data tables.

This is another great feature introduced by Google and we hope that we'll find this extra information useful especially for mobile users. We'll keep you updated with this latest web search feature. Stay tuned!

How to Host CSS or JavaScript in Blogger Using Google Drive

- 3 Comments
Sometimes we need to host our codes on some external source for our blogger templates but unfortunately blogger doesn't provides the flexibility to host CSS or JavaScript files in a separate link. That's why hosting CSS and JavaScript files on your Blogger Blog has always been a matter of concern for bloggers. Embedding external files instead of writing the entire code has its advantages. Blogger doesn't provides any option for hosting external files but luckily Google Drive provides you an opportunity for hosting CSS or JavaScript files. Hosting your codes on external sources reduces your template size and your blog loads faster. Today in this tutorial we'll learn that How to Host CSS or JavaScript in Blogger Using Google Drive.
How to Host CSS or JavaScript in Blogger Using Google Drive

Features of Google Drive

There are many features for hosting your files on Google Drive and some of them are:-
  • Lots of Space: Google drive provides you 5Gb of free space, and its enough for hosting codes. If your drive is full, you can get more space by upgrading.
  • 100% Security: Google Drive provides you full proof security for your hosted files, you don't have to worry about your files security.
  • Privacy: Google drive lets you keep your files private, if you don't want to share your files with others you can change its privacy to Private and no one will be able to access except you.
  • Create and collaborate: Google drive provides you the flexibility to host different kinds of spreadsheets.
  • All this for Free: Yes all this is for free, you don't have to pay a penny for hosting you files on Google Drive.

How to Host CSS in Blogger Using Google Drive

Step 1. First of all you've to create the CSS file. To do this, copy the CSS code from your template that you want to upload. Log in to your Blogger Account >> Template >> Edit HTML >> Search (Ctrl+F) for <b:skin><![CDATA[ tag and copy the code till the ]]></b:skin>.
How to Host CSS or JavaScript in Blogger Using Google Drive
Step 2. Prepare your style.css file After copying the CSS code paste it in the notepad and remove that code from your template. Now save the notepad and name it as style.css. Note: The file extension must be in .css
How to Host CSS or JavaScript in Blogger Using Google Drive
Step 3. Now you've to host your CSS file. Go to Google Drive and log in to your Gmail account. Click Create >> create a new Folder >> Name it whatever you like such as mycodes or myscripts etc. and click Create button
How to Host CSS or JavaScript in Blogger Using Google Drive
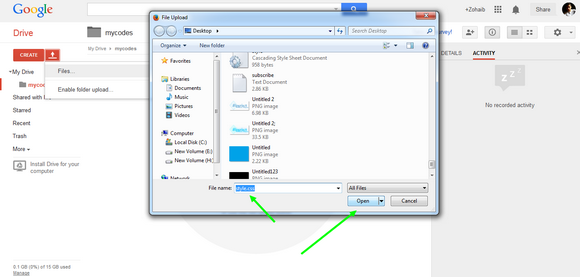
Step 4. Open that folder >> Click Upload button and choose Files >> Now it will request you to choose your files, so select you file and click the Open button. A wizard would appear on the right side of your screen displaying your upload status.
How to Host CSS or JavaScript in Blogger Using Google Drive

How to Host CSS or JavaScript in Blogger Using Google Drive
Step 5. Once the file is uploaded, click the Share button >> Click the Get Shareable Link and choose Anyone Can View the File option. It will provide you the sharing link
How to Host CSS or JavaScript in Blogger Using Google Drive
Step 6. The sharing link would be something like https://drive.google.com/file/d/your-unique-file-code but you have to change it to https://googledrive.com/host/your-unique-file-code. For example if my file link is https://drive.google.com/file/d/0B43vwjPtKakCODMzcEc2amM3ZTQ so i will change it to https://googledrive.com/host/0B43vwjPtKakCODMzcEc2amM3ZTQ, Hope you got it.
Step 7. Its Time to Add your File/Link to Blogger. Log in to your Blogger Account and go to Template >> Edit HTML. Now search for the <head> tag and paste the below code just above/before it. Note: Don't forget to replace https://googledrive.com/host/your-unique-file-code with your file link that we created in the previous step and make sure that you've removed the CSS code from your template as we mentioned in the step 2.

<link href='https://googledrive.com/host/your-unique-file-code' rel='stylesheet'/>

Step 8. Click the Save Template button and you're done!

How to Host JavaScript in Blogger Using Google Drive

To host JavaScript on Google Drive, you have to follow the same steps, the changes are that the file Extension must be in .js form in case of JavaScript and for adding it to blogger use the code below

<script src='your-googledrive-javascript-link-here' type='text/javascript'></script>

Congratulations: You've successfully hosted your CSS and JavaScript in blogger using Google drive.

From Editors Desk

We hope that you've learned How to Host CSS or JavaScript in Blogger Using Google Drive. Share this tutorial with your friends and don't forget to subscribe us!
Got a Question? Please don't hesitate and ask us in the comments section below. If we missed something, then leave a comment below.